Pages

Sunday, October 28, 2012

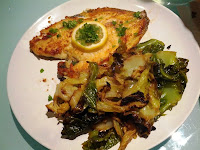
Sole alla Mugnaia


Preparation time: 10 minutes.
Details: approx. €10-15 to serve 4 people.


sole mugnaia, sole à la meunière, plaice à la meunière, plaice recipe, sole recipes, cooking soles, fish alla mugnaia, fish à la meunière
This is just a super easy and tasty recipe that can save you from the usual canned tuna salad or  grilled chicken fillet. The recipe is originally french (sole à la meunière), but it's always been a very popular dish in Italy and we will post the Italian lighter version. 

You don't need much: just go to any shop and buy some fresh soles or plaices (1 per person)! . Plaices are also very nice and you don't even need to skin them as it's very easy to remove the skin when you eat them after being cooked.

After buying the fish, just go back home: most probably you already have the remaining ingredients in your fridge! That's what you need:
  • 4 soles/plaices
  • 120 grams butter
  • parsley
  • flour
  • salt
  • lemon
The steps are super easy: flour the plaices/soles in the flour and shake off the excess.

sole mugnaia, sole à la meunière, plaice à la meunière, plaice recipe, sole recipes, cooking soles, fish alla mugnaia, fish à la meunière

In a large nonstick skillet, heat 2 tablespoons of the butter and the oil over medium heat. Saute the fish on both sides until nicely golden brown, about 5 minutes per side.

sole mugnaia, sole à la meunière, plaice à la meunière, plaice recipe, sole recipes, cooking soles, fish alla mugnaia, fish à la meunière

Remove the fish to a serving platter and keep warm, discarding the cooking fat. Mmmm.... what a great smell (ahah ok, I need to do some crap marketing sometimes)! Before starting eating, slice the lemon and chop the parsley, which you should then sprinkle all over the fish together with some lemon juice.
As a side, we decided to fry some coarsely cut cabbage with some extra-virgin olive oil, a whole garlic clove and a pinch of Italian chili.

sole mugnaia, sole à la meunière, plaice à la meunière, plaice recipe, sole recipes, cooking soles, fish alla mugnaia, fish à la meunière

A simply perfect & cheap dinner ready in just 10 minutes. 

Bye bye canned tuna!!

Monday, October 22, 2012

Roman walks: forno Campo De' Fiori


forno campo de' fiori rome
There's nothing better than a weekend in Rome in the middle of October: it's warm, it's beautiful, it's home, it's Rome. Plus, it was 25° and ridiculously sunny, and the reassuring brownish-yellow-light blue Roman colours were shining!

No, I could not spend my weekend back home without thinking at our beloved blog. So, today we'll start with a series of posts dedicated to Roman pilgrimages to holy food sites. And we can't start our pilgrimage without talking about the glorious Forno Campo De' Fiori, can we? 


Ok, we need to do some history first ...

In fact, the Forno is located in Campo De' Fiori (literally, "field of flowers" - the name was first given during the Middle Ages when the area was actually a meadow), a very famous square in which a food market is held every day (except Sundays). You can find a statue of the philosopher Giordano Bruno in the middle of the square: he was burnt alive here for heresy in 1600.


campo fiori, forno campo fiori, pizza campo fiori rome

Campo De' Fiori square is located in the baroque area of the city, enclosed between River Tiber, Piazza Venezia, via del Corso and Piazza del Popolo. In this relatively small area you can find tens of extraordinary churches, world-famous paintings, old roman monuments and enjoy the tales that every street tells you while passing by.


rome pictures
central rome, piazza navona, pizzeria roma

Yes, this is getting boring. Let's talk about real things: our Forno!

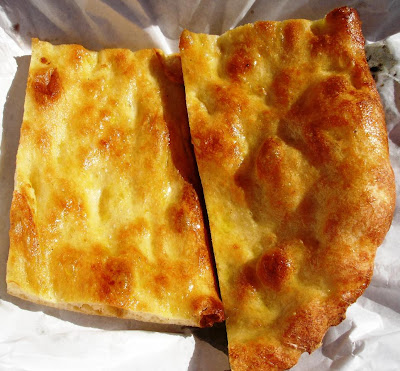
Well, this is by far one of the best Forno in town: here you can find an absolutely mouth-watering Pizza Bianca and many other Pizza Al Taglio variations. We are not talking about round pizzas you can eat in pizzerias: this is Pizza al Taglio (see here the dedicated post), which you can buy in local Fornos (i.e. bakeries) or dedicated shops. Pizza bianca is their showpiece: a crunchy, chewy olive oil-based flat bread that lands on the chopping block still hot and straight from the oven every 10 minutes at peak times. And yes, you can see how they make it running through the "kitchen" just behind the counter!

pizza bianca roma, pizza campo fiori, how to make focaccia

Look at this: orgasmic! If only you could smell the pizza scent when it is taken out of the oven...


forno campo de' fiori rome

Of course, you simply cannot miss all the other pizzas (the Margherita is lip-smacking, but also all the other variations are one step above the rest!), including confectionery, biscuits and the large range of breads they produce every day in the shop. 


If you happen to travel to Rome, it's easy to find our beloved Forno: Giordano Bruno is looking exactly at the Forno, whose name is clearly indicated on the walls. I wonder if he had the chance to eat such a thing...

pizza in rome, pizza restaurant rome, pizzeria roma

As you can see in the above picture, the same Forno guys own a twin shop which is located on the Forno's left side: you can find a gorgeous "pizza farcita" there (i.e. pizza bianca filled with fresh ingredients like ham, mozzarella, ham&figs, etc.).

If you can't go to Rome tomorrow morning and have lunch there, you can simply try our great homemade Pizza al Taglio recipe!

If you can't eat carbs or have some kind of allergy but will be in Rome tomorrow morning, you can also opt to spend a whole morning beside the entrance of the shop and smell heaven: it's worth it, surely not less than a Michelangelo painting.


Saturday, October 20, 2012

Chocolate fondant...what else?

Preparation time: 10 minutes for the preparation, 8-10 minutes for cooking.
Details: approx. €10 to serve 15 fondants


chocolate fondant, chocolate brownie
A.k.a. "How to kick off a chilly-but-dry weekend in Dublin", the chocolate fondant is a simple but sensational dessert. 

This recipe has all the requirements to be declared as the perfect dessert recipe: simple, fast, no weird ingredients, you can prepare it in advance and above all, it's with CHOCOLATE.
The only important thing is that you have to know your oven very well, in order to get the right consistency: a little bit crunchy on the side, but exceptionally warm inside.


So, take out from the sideboard:
  • 200 gr. of dark chocolate (70%)
  • 180 gr. of butter
  • 40 gr. of flour
  • 4 eggs
  • 160 gr. of sugar
  • cupcake moulds
Directions: 

Melt the chocolate and the butter together in bain-marie. Whisk the eggs and the sugar together, adding the flour in the end.
Add the melted chocolate to the mixture and use a wooden spoon to blend it well, until you have a smooth cream.


chocolate fondant, brownie, chocolate recipes

Put the cream into the moulds, previously greased with butter and floured (if you are using silicone or paper moulds you don't need to use butter and flour). Fill the moulds for 3/4 and either:
  • cook them immediately (180°, for 13 minutes - ventilated oven)
or
  • freeze them and keep them for whenever you want to serve them. You can put them in the oven still frozen and the result will be exactly the same.
As I mentioned before, the only complicated part is when you cook them. In order to keep the centre soft and warm, you need to take out the fondants from the oven as soon as you see little cracks on the top:

chocolate fondant, brownie, chocolate recipes

Garnish them with red fruits, mint leaves and serve them!

Tuesday, October 16, 2012

Italian Apple tart - torta di Mele

Preparation time: 40 minutes for the preparation, 1 hour for the baking.
Details: approx. €20 to serve 6 people


apple tart, Italian apple tart, home made apple tart
There's only one remedy for the sudden end of the summer: welcome in the next season with open arms! Yes, we have to convince ourselves: Autumn is great and full of romance. 

Last Sunday the rain was falling slowly upon the fields, trees were losing their leaves, the sky was grey and gloomy.  And shops were closed. I could not think of a more depressing moment, so I started looking for a solution. And what's better than an Apple Tart to start the Fall/Winter Season 2012?

Looking at different Italian Apple Tart recipes, I found this one which is the right mix between tradition and innovation. Of course, the Italian Apple Tart is very different from the American Apple Pie (there is no pastry cover) and the British Apple Crumble (no butter crumbs).


Aprons on! Get ready with:
  • 280 gr. plain flour (00)
  • 160 gr. Butter
  • 500 gr. Apples (Gray Pippin Apples, or "Mele Renette")
  • 300 cl. Milk
  • 100 gr. Sugar
  • 80 gr. of Rich Tea Biscuits
  • 40 gr. of Raisins
  • 3 Egg Yolks
  • 1 Vanilla Bean
  • 3 Tablespoons of Apricot Jam
  • 1 Lemon
  • 3 Tablespoons of Marsala liquor (€ 12,99/bottle at Best of Italy Shop)

Short-crust Pastry:
Mix together 250 gr. of flour with the butter (still cold), cut into small pieces. Add 2-3 tablespoons of water and mix until the pastry became smooth. Cover it with cling film and put in the fridge for at least one hour. After that, roll it (3 mm height) over a spring-release tin (previously greased and covered with baking paper) and riddle it with holes. 
Keep in the fridge the extra dough.


apple tart ingredients, shortcrust pastry

Marsala Italian-style Custard:
Whisk 2 egg yolks with 50 gr. of sugar, then add 3 tablespoons of Marsala and the remaining flour. In the meantime, heat the milk up with the Vanilla Bean, carved along the side. Pour the hot milk into the mixture and put everything on the stove, mixing well, until it  thickens.

Apple Tart:

Crumbles the biscuits and spread them over the pastry in the tin. Cover it with the cream and make another layer of crumbled biscuits and raisins (previously softened up in the Marsala). Keep a spoon of raisins aside, for later.
Peel off and cut into slices the apples: position the apple slices on the top of the tart.
For the central decoration: take a regular shaped apple and peel it, removing the applecore. Put it into a saucepan and cover it with water, adding some lemon peel and 20 gr. of sugar. Let it cook for 10-15 minutes; drain it and cover it with shortcrust pastry strips. Fill the central hole with the remaining raisins and a tablespoon of apricot jam.
Brush the pastry over the central apple with the remaining yolk; heat up the remaining jam and spread it over the apple slices, sprinkling the sugar over the whole tart.


Cook in the pre-heated oven at 180° for 50 minutes or until the pastry gets dark.


Apple Tart, Italian apple pie, home made Apple tart

Enjoy!

Friday, October 12, 2012

How to Make Panzerotti & Pizzelle

Preparation time: 10-15 minutes for the preparation, 1 hour for the rising, 5 minutes for cooking
Details: approx. €15 to serve 7 people

Ok, we could not end the Pizza chapter without talking about the world-renowned Panzerotti and the not-so-famous-but-even-better Pizzelle Napoletane.

Seriously, have you ever tried a real pizzella or panzerotto outside Italy? Well, it's ridiculously difficult, rather impossible. We all agree: that's a real shame. However, the good news is that you can perfectly reproduce the authentic recipe.... at home!

We're talking about a super-easy recipe that does not require any long rising time and, most of all, makes everybody happy! Why? It's fried. And funny. Everybody can make it's own panzerotto during a party or friends dinner, filling it with the ingredient he/she likes the most. It will then take seconds to cook.

Ok, I'm talking way too much (ingredients are for approximately 4 people):
  • 500 gr.  strong white flour (better if stoneground) 
  • 25 gr. fresh yeast  (see the Pizza post for more infos about yeast)
  • 125 gr. water
  • 125 gr. milk
  • 1 egg
  • 1 teaspoon salt
  • 1 teaspoon sugar
  • 1 tablespoon extra-virgin olive oil
  • deep frying oil
Crumble the yeast with your hands and put it in a plastic/glass bowl. Add milk and mix it with the yeast for a while. Then add a previously whisked egg, water, sugar, oil. After whisking all the ingredients together, gradually add the flour.  Whisk everything with a fork for 1 minute and then add salt (when the yeast is melted with all the other ingredients). Never add salt before mixing the ingredients, as it would damage the yeast. Continue to whisk with the fork and then with your hands. 

Pizzelle Napoletane, Panzerottim flour, yeast, Pizzelle recipe, how to make panzerotti, pizzelle recipes, pizzelle and panzerotti, panzerotti dough, pizzelle dough

You don't need to knead the dough or remove it from the bowl: the important is that it gets quite compact (still, not dry), like the one in the picture below. Donìt whisk the dough too much: you need to respect His Majesty the Yeast.

Pizzelle recipe, how to make panzerotti, pizzelle recipes, pizzelle and panzerotti, panzerotti dough, pizzelle dough


When it gets like this, leave it rise for 1 hour or 2, covering the bowl with cling film and leaving it outside the fridge at room temperature. After 1 hour (or 2), remove the film and stretch the dough on the counter. It should be quite thin, approximately 0,5 cm thick. 

Heat the frying oil in a saucepan until it gets ready for frying. Use the old method to check if the oil is ready: drop a bread crumbs or a very small piece of dough into the oil. If it takes 60 seconds to brown, then the oil is at 365.

Here we go with the 2 variations! Apologies for the low-quality pictures, but pizzelle & panzerotti are super good when they're hot and we could not waste time with the camera, of course!

Pizzelle

For Pizzelle, you need tomatoe sauce, grated parmesan and a leaf of basil for each pizzella. Tomatoe sauce should be rigorously neapolitan: to prepare it, just fry 2 pieces of garlic in a pan with some extra-virgin olive oil. When garlic gets brownish add the pomodori pelati (tomatoes "pelati") and season the sauce with salt and pepper. Let it cook over a low fire for 20 minutes,  adding water if the sauce is draining too much.

Use a glass to shape the dough so that you have round pieces, i.e. our Pizzelle. Gently lower them, one by one, into the oil. Let them fry for 1/2 minutes until they get dark brown (don't take them out too early, as the dough might not completely cook inside).

When ready, drain them on a tray and add the topping: a bit of tomatoe sauce, grated parmesan, grated Pecorino and a leaf of basil. Yummy.

Pizzelle recipe, how to make panzerotti, pizzelle recipes, pizzelle and panzerotti, panzerotti dough, pizzelle dough


Panzerotti

Same as before, you just need to shape the dough differently and fill it with whatever you might have in your fridge. Ok, I was joking when saying "whatever" (Actually I was not joking when saying this, until I went to a place here in Dublin offering panzerotti filled with ham and pineapple...). Cut the dough to form a slightly bigger rectangle and add fresh ingredients in the middle of it.  Recommended combinations of ingredients to fill in the dough:
  • Mozzarella + anchovies
  • Mozzarella + chopped salami + provola cheese
  • Ham + mozzarella
  • Whatever Good and Reasonable you have in the fridge (no pineapple, please!)
Then fold it over and make a little half moon. Now press the edges to seal them and remove the air inside (start from one side up to the other of the half moon). It's now ready to go in the pan! Unbelievably delicious.

Pizzelle recipe, how to make panzerotti, pizzelle recipes, pizzelle and panzerotti, panzerotti dough, pizzelle dough

I should just stop eating. . .

Tiramisù time!

Preparation time: 15 minutes for the preparation, 2 hours in the fridge before consuming.
Details: approx. €15 to serve 8 people


Best Italian Tiramisù Recipe, Tiramisù Recipe, How To Make Tiramisù, Best Tiramisù, Making Tiramisù, Easy Recipe Italian Tiramisu, Best Tiramisu
It's time to please also our sweet-tooth followers and what better than a Tiramisù to end a typical Italian dinner?

The recipe is super simple and on top of that, you can easily prepare it in advance and serve it the day after: it's even better when all the ingredients have rested together for a while.
This is my aunt's recipe - one of the best Tiramisù I have ever tasted - and here it is what you need (the quantities indicated here serve 8 people approximately.):


  • 5 large eggs
  • 5 tablespoons sugar
  • 470gr. Mascarpone Cheese
  • 2 packs of Ladyfinger Biscuits (a.k.a. Savoiardi)
  • Some Italian Espresso, diluted and sugared (according to your taste) or some normal coffee: it needs to be liquid and not too much concentrated.
  • An electric whisker 
  • Unsweetened cocoa powder
Optional:

  • Marsala Liquor
  • Chocolate flakes
You can find the Mascarpone Cheese and the Ladyfingers biscuits quite easily: I usually find them in SuperQuinn, Best of Italy or in Fallon&Byrne.

Directions

First of all, separate the yolks from the egg whites - do it very carefully because the eggs whites don't stiff if there are yolks traces. Add the sugar to the yolks and whisk together with the electric whisker, until they form a light, foamy mixture.
Quick Tip: if you are going to use Espresso Coffee, prepare it firstly: in this way it will have time to cool down and you won't scald your fingers when you dip the biscuits into it.

Mascarpone cheese, espresso coffee, yolks and sugar, Best Italian Tiramisù Recipe, Tiramisù Recipe, How To Make Tiramisù, Best Tiramisù, Making Tiramisù, Easy Recipe Italian Tiramisu, Best Tiramisu

Add the Mascarpone Cheese, in small stages, and keep whisking the ingredients together until you reach a homogeneous, lumps-less cream.

Tiramisù cream, yolks, sugar and mascarpone cheese

Put the egg whites in a clean bowl and beat them until stiff: you'll realize you have done when you turn the bowl upside down and the egg whites don't fall down.

egg white, how to stiff egg whites

Add the stiff whites to the cream, with a tablespoon or a spatula; don't use the electric whisker otherwise the egg whites will loose the right consistency.

Final Tiramisu Cream, Tiramisu custard

Once the cream is done, let's start with the Tiramisù composition: prepare a recipient and dip the biscuits into the coffee. Biscuits don't have to be too much soaked, otherwise they will crumble apart. They need to form the tender-but-firm layers of the cake. Put the biscuits in the recipient, one beside the other, until you cover the whole bottom of the recipient. Now, cover them generously with the custard and spread the custard over the biscuits.
Follow the same procedure for the second layer. Sprinkle the cocoa powder on the last layer.

Tiramisu composition, tiramisu ingredients, cocoa powder, Best Italian Tiramisù Recipe, Tiramisù Recipe, How To Make Tiramisù, Best Tiramisù, Making Tiramisù, Easy Recipe Italian Tiramisu, Best Tiramisu

If you like, you can add chocolate flakes between one layer and the other: this will give your Tiramisu a "crunchy" flavour, which is loved by someone. Another variation, according to your liking, consists in adding some Marsala liquor to the coffee, before dipping the Ladyfingers into it.
Honestly I prefer the simple, classic one. 

Let the Tiramisù rest in the fridge for at least two-three hours, before serving it with a cup of Espresso, or a glass of Limoncello.

And if you ever come to Rome, don't miss one of the most traditional Tiramisù shop: Pompi. Here you can find different Tiramisù flavours, like Strawberry, Pistacchio, Banana and...Piña Colada! Get ready to enjoy a typical Roman after-dinner meeting place.

Thursday, October 11, 2012

Parmigiana Di Melanzane: The Perfect Recipe.


Preparation time: 30-40 minutes for the preparation (depending on the size of the frying pan),  30 minutes to cook in the oven
Details: approx. €15 to serve 6 people

It's true, we simply can't live without aubergines and that's why we are here to present a Must for any wanna-be Italian cook: the glorious, magnificent Parmigiana Di Melanzane (friends call it also "Parmigiana")! 

For those unlucky people who have never heard of it, it's a sort of lasagna with fried aubergines (aka eggplants) instead of pasta. More or less. To preserve the sacredness of this recipe, it is necessary to point out the 4 biggest mistakes people do when pretending to make a Parmigiana: 
  1. The worst of all: using ragù or bolognese sauce instead of simple tomato passata - garlic - basil sauce. If you're adding meat in the sauce you're making greek moussaka. Parmigiana is Italian!
  2. Adding grated mozzarella instead of fresh mozzarella or real Italian provola.
  3. Adding inappropriate ingredients like: cinnamon (yes, I found it in a Parmigiana once), peppers, corguettes, etc.
  4. Just don't trust Jamie when it comes to Italian Recipes (look here to see all his heresies about the Parmigiana)
So, please follow this post carefully: we are absolutely intransigent about this recipe, which is extremely simple and does not require any rare ingredient. After all, we're talking about a status symbol of every Italian living abroad.

What you need is:
  • 4 big aubergines (if you are buying Tesco/Fresh/Spar/Superquinn standardized aubergines, then it's 6-7 aubergines - they sell ridiculously small veggies!). More or less, 2 kg aubergines should be ok.
  • 300 gr mozzarella or Italian provola
  • 700 gr pomodori pelati 
  • 200 gr grated parmesan
  • 2 garlic cloves
  • many leaves of basil
  • extra-virgin oil for the tomatoes sauce and frying oil, 2 tbsp salt

Take the aubergines and cut them into long thin slices. Do not skin the aubergine, as most of their flavor is in the skin itself. As aubergines can have a quite bitter taste (especially those imported in Ireland),  sink them in a well-salted cold water for one hour to remove the bitterness. Then drain the aubergines, pressing them lightly between the hands with a kitchen cloth.


aubergine parmigiana, parmigiana di melanzane, parmigiana melananze recipe, how to make parmigiana melanzane, aubergine recipe, italian recipe, aubergine and parmesan


While the aubergines are getting sweeter, you can start preparing the tomato sauce, chopping the mozzarella in small pieces or chopping the Provola, if you are using that - today we have used both provola and mozzarella to empty the fridge! For the tomato sauce, just fry 2 pieces of garlic in a pan with some extra-virgin olive oil. When garlic gets brownish add the pomodori pelati (tomatoes "pelati") and add salt and pepper. Let it cook over a low fire for 20 minutes, adding water if the sauce is draining too much.


aubergine parmigiana, parmigiana di melanzane, parmigiana melananze recipe, how to make parmigiana melanzane, aubergine recipe, italian recipe, aubergine and parmesan


You can now start frying the slices, lowering them in a saucepan containing 3 cm of frying oil at the right temperature (use the old method to check if the oil is ready: just drop few bread crumbs or a very small piece of dough into the oil. If it takes 60 seconds to brown, then the oil is at 365). The frying part is the most boring one: it might take from 30 minutes up to 1 hour to fry all the slices, depending on the size of the saucepan. Fry them until they get a deep golden colour, witout burning them. Remember that aubergine slices should not be floured or dipped in whisked eggs before being fried. This might result in a quite fat and heavy recipe, tasting worse and - above all - you would violate tradition.


When the frying is over, let the aubergine slices drain on paper towel sheets and then start building our beloved Parmigiana! How? It's easy: just put some tomatoe sauce at the very bottom of the tray, and then start assembling the Parmigiana by creating 4-5 layers of aubergines, each of which must covered with some tomatoe sauce, grated parmesan (that blends all the ingredients), chopped mozzarella/provola, some basil leaves and a bit of salt.


aubergine parmigiana, parmigiana di melanzane, parmigiana melananze recipe, how to make parmigiana melanzane, aubergine recipe, italian recipe, aubergine and parmesanv


Complete the assembly by creating the last layer and covering it with the remaining tomato sauce, mozzarella and/or grated parmesan and basil leaves. Sprinkle the last layer with some extra-virgin olive oil.


aubergine parmigiana, parmigiana di melanzane, parmigiana melananze recipe, how to make parmigiana melanzane, aubergine recipe, italian recipe, aubergine and parmesan


Preheat the oven at 200° and bake for 30/35 minutes until the Parmigiana gets like this:


Pure Joy.

---


A special thanks to Cò for the atmosphere and hospitality, and to the Dolphin's for their creative food solutions!

Recipe on the left is called "Laura's Fagiolini": put frozen grean beans directly in a saucepan with extra-virgin olive oil and 2 cloves of garlic. Simmer all together and when the beans get a beatiful, darker colour, add some passata (tomato sauce) and simmer over a low flame for about 10 minutes.

Recipe on the right is Luigi's "Tripudio Di Mortadella": handmade artistic mortadella waves, baguette slices.


Saturday, October 6, 2012

Home-Made Pizza Al Taglio!

Preparation time: 20 minutes for the dough, 24 hours of rising, 10 minutes for the toppings and 20 minutes for the baking.
Details: approx. €13 to serve 7+ people

We decided that no, we could not name a blog "Mad Italian Foodies" without starting with the most adored and popular Italian recipe: Pizza al taglio! Pizza al taglio is a very popular type of pizza baked in large rectangular trays, and generally sold in rectangular slices by weigh. The post is quite long, but the recipe is super-easy and quick (apart from the 24 hours needed for the rising).

This is a foodies' pizza, of course. So, please forget about:
  • Precooked pizza bases
  • Plain white flour, or self-raising flour
  • Frozen/Low quality ingredients
  • Baking powder
And get ready to use:
  • 1 kg strong white flour (better if stoneground) - €2.90
  • 25 gr. fresh brewers' yeast OR 7 gr. dried yeast - €0.80
  • 700 gr water 
  • 20 gr extra-virgin olive oil, 15 gr. salt
  • 300 gr of mozzarella - €3.00
  • 500 gr of canned pomodori pelati (not "Passata") - €3.00

Ok, the first big problem was finding out a proper fresh brewers' yeast in Dublin, without which any wanna-be pizzaiolo would be lost (actually dried yeast is also great). Dublin is a beautiful town but when it comes to food supplies it can be quite disappointing. It's been super hard to find fresh brewers' yeast and after weeks of searches, we finally realized that one of the few places you can find it in Dublin is "PoloLith", a tiny little Polish shop in Rathmines Road, just next to the more famous "Joe Burger". PoloLith has it, Fallon&Byrne and Best of Italy don't. Thank you PoloLith!

where to buy fresh yeast, where to find brewer's yeast, where to buy beer yeast, fresh yeast, brewers' yeast, polish shops in Dublin

Few days after the pizzata, we came across this little gourmet food shop in Donnybrook road, called Roy Fox.  Unexpectedly, we found an excellent dried brewer's yeast (it's not fresh, but it's great as well for our pizza - see the ingredients above for the correct quantity).


where to buy fresh yeast, where to find brewer's yeast, where to buy beer yeast, fresh yeast, brewers' yeast, polish shops in Dublin, fresh yeast, brewers' yeast, polish shops in Dublin, where to find brewer's yeast


As you might understand, also flour is extremely important and it is crucial to buy the right type: the pizza dough requires a quite strong flour (the Italian "farina" 0 or 1). A great product is Odilum White Strong Flour, easily found at Tesco or Superquinn. Why strong flour? Because it's high in gluten, and this will transform into a lovely, elastic dough, which is what you want.

Anyway, Let's Start!

Put the flour in a glass/plastic bowl (don't use a metal one, as it might screw up the yeast) together with the yeast fragmented in pieces. Gradually add the water and swirl it, mixing it with the flour and yeast with a spoon. 


Pizza dough, fresh yeast, pizza at home, homemade pizza


After a while, add 15 grams of grinded salt and 20 grams of extra-virgin olive oil and mix. it is important to add salt only after the yeast has melted with the flour, otherwise the dough will be lost forever. After mixing salt and oil with the spoon, the dough should look exactly as in the picture below (right side). It' should be quite wet and "muddy". Never add extra flour!


pizza dough, pizza kneading, flour dough, fresh yeast, pizza bianca at home, pizza al taglio, how to make pizza at home, pizza recipe


Let it rest for 10 minutes when it's still uneven as shown in the last pic. When 10 minutes are over, start work the rest of your mix with the hands until you have a springy, smooth dough. The dough is sticking to your hands? It's normal, you're on the right way. Take the dough out of the bowl on a previously floured counter (we used semolina - much better!). Knead the dough to dry it a bit (as shown here, minutes 5:20) and put it in a glass bowl. 


Dough kneading, pizza dough, pizza toppings, homemade pizza, pizza dough, pizza kneading, flour dough, fresh yeast, pizza bianca at home, pizza al taglio, how to make pizza at home, pizza recipe


Cover the bowl with a cling film and store it at the bottom of your fridge (where veggies are usually stored). Let it rest there for 24 hours. The fridge bottom floors are the ones where humidity's higher and temperature steadier, the perfect environment for our yeast! When the required 24 hours have passed, leave the bowl outside the fridge for about 1 hour to allow rising at room temperature. In the meantime, you can start preparing the topping! Which one? Well let's start with the most classical one, Pizza Margherita! For the topping you'll need to:  
  1. Chop 2-3 fresh Italian mozzarella and leave them apart in a bowl to dry for a while   
  2. Prepare a tomatoe sauce. Please use only Italian canned "Pomodori Pelati" (Best of Italy in Ranelagh has many brands). Never use a Passata, as it is already quite dry: we need the sauce to be liquid enough to resist the heat in the oven. Make a soffritto of 2 garlic slices. When garlic gets brown, add the pomodori pelati (previously chopped a bit) and leave them simmer for about 10-15 minutes at low gas, adding some salt, pepper and a teaspoon of sugar. At the very end, add fresh basil leaves. Italian recipes are simple: please, please, don't add onions, bacon, mexican-chilli or other useless extra-ingredient. You will lose all the taste!
After that, it's time to roll out our pizza! Do it carefully. Watch out. Flour your hands and the counter, then take the dough out and start stretching the pizza, strictly using your fingers ONLY (as shown here, from minute 6:15). The dough should be quite thin, there's no need to make it too thick as it will rise in the oven!

dough, pizza dough, stretching the dough, homemade pizza, pizza dough, pizza kneading, flour dough, fresh yeast, pizza bianca at home, pizza al taglio, how to make pizza at home, pizza recipe


Put the pizza in a previously oiled tray, oil the top of the stretched dough and start adding the topping. Spread the topping on the dough uniformly using your hands. To make a Margherita, cover the dough with the tomatoe sauce and put it in a pre-heated oven at 250°/270° for 20-25 minutes maximum.


pizza toppings, pizza sauce, pizza margherita, pizza baking, pizza dough, pizza kneading, flour dough, fresh yeast, pizza bianca at home, pizza al taglio, how to make pizza at home, pizza recipe

pizza dough, pizza kneading, flour dough, fresh yeast, pizza bianca at home, pizza al taglio, how to make pizza at home, pizza recipe


Watch out: oven is crucial. Start putting the pizza at the very base of the oven and - after about 10 minutes- move the tray to the upper part of the oven to speed up the baking. This is a mandatory procedure to have a delicious pizza.

Add the mozzarella 3 minutes before the end of the baking, put the tray back in the oven and wait for the mozzarella to melt. Serve with fresh basil leaves and sprinkle with E-V olive oil

pizza baking, pizza al taglio, pizza mozzarella and tomatoe

And yes, always use scissors to slice the pizza, so that the yeast is not damaged.

home-made pizza margherita, how to slice a pizza, how to make pizza at home, pizza dough, pizza kneading, flour dough, fresh yeast, pizza bianca at home, pizza al taglio, how to make pizza at home, pizza recipe


Ok the recipe proportions allow for at least 2 other pizzas (depending also on the baking tray dimensions of course). We were 5 people having dinner, so we decided to use part of the remaining dough for a second pizza: pizza bianca with rocket salad, prosciutto and parmesan shaves! Amazing.

Basically you just need to oil the dough, previously stretched on the baking tray and put in the oven (10 minutes at the bottom, 10 minutes at the top). When the dough gets a beautiful, brownish, yummy colour, just remove the tray from the oven and add the fresh ingredients without baking them. This is simply delicious.

pizza bianca, homemade pizza, pizza al taglio, focaccia, pizza dough, pizza kneading, flour dough, fresh yeast, pizza bianca at home, pizza al taglio, how to make pizza at home, pizza recipe

This recipe by Bonci (see this post) is simply incredible and it's the best possible way to reproduce the authentic Italian Pizza al Taglio at home, no matter where you live! It's only a matter of good ingredients, process and hints. Remember: if you "respect" the yeast (which is a live ingredient), if you prepare the dough following our tips, stretch it properly only with your fingers and pay attention to the baking part, you cannot fail.

Look at the picture below, these pizzas are simply amazing!

pizza dough, pizza margherita, pizza al taglio, pizza dough, pizza kneading, flour dough, fresh yeast, pizza bianca at home, pizza al taglio, how to make pizza at home, pizza recipe


Ok, if you don't wanna wait 24 hours for a pizza tonight, just go to Manifesto or Manifestino :-)


ps. Special thanks to Seb who contributed to the pizzata taking pictures and bringing prosciutto and wine, french wine (nobody is perfect!). A big thank to Kim and Conor, our official testers and raters!

French Wine & Soppressata!